Apne Blogger me Bell Notification icon kaise add kre - Step-by-Step :
Hello friends ager ap v apne blog me Bell Notification button krna chate hai
to aap bilkul perfect article pdh rhe hai, Is article ko pdhne k badh ap v
apne blogger website pe aisa he Bell Notification button add kr pynge.
 |
| Blogger me Bell Notification icon kaise add kre - Step-by-Step |
Blogger me Bell Notification icon kaise add kre - Step-by-Step
Hum apne blogger pe bell Notification button add kre usse phle yea jaan lete
hai akhir iska use kya hai or yea humera blog k lyea kyu important hai.
⇒ Jb ap koi new blog post krnge to iske jriyea apke readers tk apki new post
ka notifiation jyegi or wo us post ko padh pynge.
⇒ Yea blog ko ek professional look deta hai.
To Chliyea dekhte hai Blogger me Bell Notification icon kaise add kre - Full Guide in Hindi :
Step 1: Ispe site ko open krne k lyea ispe Click kre onesignal .
Step 2: Ab apko 3 option dikhega but apko web Push Notification option pe click
krna hai.
 |
| OneSignal |
Step 3. Apne Google ya facebook se login kre.
 |
| Login with Facebook or Google |
Step 4: Ab ap Next krte jye ya Skip v kr skte hai.
Step 5: Add a new app pe Click kre or apne blog ka naam de or create pe click kre
 |
| Add a new app pe click kre |
Step 6: Web push ko select kr k Next pe Click kre.
 |
| Web Push pe Click kre |
Step 7: Choose integration me Wordpress plugin and website Builder pe Click
kre or Blogger ko select kre.
 |
| Blogger ko select kre |
Step 8: Niche diyea sara kuch ache se fill kre.
Step 9: Ek bell ka icon download kre or use Google Drive me upload kre or uske
Link ko upload k option pe paste kre. Download Bell Icon
Step 10: Add a Promot pe click kre.
 |
| Form ko ache se Fill kre |
Step 11: Agr apko kuch Customise krna hai to kre nhi to Save option pe click
kre.
 |
| Customise kre agr jrori ho to |
Step 12: App Id ko copy kre
 |
| App Id ko Copy kre |
Step 13: Niche Diyea gye Code ko ache se copy kre .
<script src="https://cdn.onesignal.com/sdks/OneSignalSDK.js" async='async'></script>
<script>
var OneSignal = window.OneSignal || [];
OneSignal.push(["init", {
appId: "YOUR_APP_ID",
autoRegister: false, /* Set to true to automatically prompt visitors */
httpPermissionRequest: {
enable: true
},
notifyButton: {
enable: true /* Set to false to hide */
}
}]);
</script>
Step 14: Is code pe "YOUR_APP_ID" k badle apna app id daale.
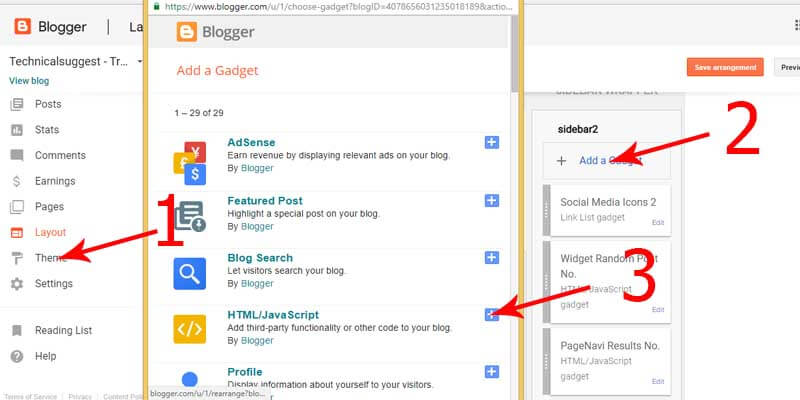
Step 15: Ab apne blogger ko login kre or Layout pe Jye .
Step 16: Add a Gadget pe click kre or HTML/JAVA SCRIPT ko select kre.
 |
| Codes ko blogger me add kre |
Step 17: Uper wale code ko pase kre or SAVE pe click kre .
⏩ Lo bann gya kaam, ab ap apna blog open kre or refresh kr k dekh le aya ya
nhi agr nhi aya to ap apna browser ka case clear kr k dekh le ya koi new
browser me open kre agr fir v nhi aya to smj le apne kise step ko miss kiya
hoga.Agr miss kiya hai to yea App ko delete kre or fir se ne App bna le .
Ummid hai apne ache se bna lyea hoga .
Read more ;
⇒ Conclusion :
Is article me humne yea dekha Push notification kya hai or ise apne blog
me kaise set kr skte hai or humne Step-by-Step ise easily set v kr lyea.
Agr apko is topic se related ( Blogger me Bell Notification icon kaise add
kre - Step-by-Step )koi v problem ho to please niche comment me btye taaki
hum apki problem ko solve kr ske.
Thank you.

ConversionConversion EmoticonEmoticon